Friday, November 6, 2015

Arielle Skirt Accomplished!

I'm a little behind, I know.

But - I finished the Arielle skirt! And without any tears, cursing, or other major (or really minor) fiascos. Success. 

Well, there was trouble with one buttonhole. And I sewed them inside out, so the prettier part's on the inside and not-quite-as-pretty part is on the outside, but it's not too bad. 


Excuse the wrinkles...I wore it, and then made Mr. Gardener take a picture at the end of the day. But, I think you get the idea. 

I am not going to tell you how long I took to make it...other than it was over the course of a weekend and a long-butt time. It really wasn't, but people who sew faster than I do (everyone) would be like, what the heckola were you doing that whole time? 


So, technically speaking, I've made two garments (well, two and a half, one is very much a UFO work in progress) previously. But, one is just barely wearable, and the other is fairly good, but not from a pattern, so that doesn't really count for these purposes.

I have to say, then, that I'm pretty qualified to say that Tilly's patterns and instructions are very beginner friendly. 

I only had a couple of moments where it took me a couple of minutes to figure out how to accomplish something from the instructions. Her book and her site were extremely helpful, however, in clarifying those couple of items. 


By and far, I'm really happy with how it turned out. 

I'm really glad I made a muslin. It helped me fix a couple of items with regard to fit. And...it drew my attention to some important points in the instructions (like how to cut it out properly so that part of the skirt doesn't end up inside out...not that I did that twice while sewing the muslin or anything). ;) 


The two main things that I did were to shorten the length. The skirt comes in two lengths - mini and pencil. While the mini really wouldn't have been too mini on me (I'm 5'1"), I wanted to wear it to work and not be concerned that it was too short. 

So, I shortened the pencil. I cannot recall how much I shortened it by - sorry!! But, I'd recommend that you make your own muslin anyway. Even with the same measurements we're all different.

I also took in the back darts. I left the bottom portion at the size 4, but graded out to the next mark on either side.

Next time, however, I think I need to take the darts in about half an inch more. It fits well everywhere, but still gapes in the back a little when I sit down. 


Other changes won't be many, but I think I'll pick a fabric with just a little more drape, too. It needs some structure, but I feel like this might just have a little too much structure.

I don't know - what do you think? 

Any other thoughts or suggestions or fit?
I also lined it and, for some reason, took no pictures. It's a basic white, definitely not exciting. But, I'm so glad I did it. It feels nice, and makes it stick less if I wear tights.

And, people, winter's coming. Tights are coming out.

I hate winter. Oh well, asi es la vida, right?

Buttons - Joann's 
Pattern - Arielle Skirt
Size 4


Wednesday, November 4, 2015

Not So Scary Y-Seams

I have a new baby quilt that I've been working on for a very special, longtime friend. 

I am incredibly happy for her, and this is going to be a really special baby. 


I've been learning Y-seams just for this quilt.

They're really not as scary as people make them out to seem.

That being said, piecing is slow-going, and I need to take breaks with other projects in between to keep my sanity, but it's not terrible. 


I am glad that it's a project that I waited on until my consistency with seam allowance improved, though.

And I have a closer relationship to my seam ripper. hahaha


I got on the somewhat low volume bandwagon.

I really wanted the colored, arrow-type pieces to pop. 


I don't know if it's a boy or girl (my money's on boy), but I think it's gender-neutral enough.

And these are fabrics that really remind me of my friend.


Look at that beauty of a seam!

Some are certainly better than others, but it's coming along nicely. 


Not too shabby here, either.  
 

I can't wait to finish this baby up and pass it on. 

I love making quilts for friends, praying for them and their families, putting my love in the quilt. 

Any new skills that you're working on?

Wednesday, October 7, 2015

Arielle Skirt - Muslin #1

So, I've been wanting to venture out into apparel for some time now.

But it's super intimidating. First of all, patterns. 

I mean, I can measure out so many inches by so many inches on a piece of quilting cotton with my ruler and rotary cutter. But how do those markings on that tissue paper stuff get on your fabric?

Am I right?

Plus, now you're working in three dimensions.

And quilting cottons just play so nice. In quilts. Not always so much in apparel.

Somehow, at some point, I stumbled on Tilly's blog.

Oh my gosh, you guys. She is adorable

And she's really good at explaining and demonstrating.

So, when her book came out, I was all over that like white on rice (3/4s white?). ;)  I have read it cover to cover multiple times, and it breaks things down in such an accessible way. And it comes with super cute patterns that I actually want to make. So often sewing books for beginners have terrible patterns. Stuff I have no interest in making. 

Not so with Tilly.

But she had this other pattern, not in her book, that I was just loving. The Arielle Skirt.

I mean how cute is that?

And work appropriate?

Yes and yes.

And I need a little distraction from some other things on my mind and heart right now?

Also yes.

So I started the Arielle.


So, I, per Tilly's great advice, made a muslin. I measured between a 3 and 4 in Tilly's sizes, so I graded between the two (how-to shown in her book and her blog) on my trusty Swedish tracing paper. 


I used Saral Tracing Paper and my Clover tracing wheel to transfer the markings to muslin (that's how you do it!) and carefully cut out.


I'm so glad I took the time to make a muslin, because it really just didn't fit the way I wanted. And if you're going to the trouble of making something for yourself, it really should fit well, right? 

I mean that's the advantage of sewing.

I'm certainly not "average" size wise. Who is? I'd like to meet you. ;)

I'm shorter than what ready-to-wear considers petite for example.  I'm 5'1" and "petite" is made for a 5'4". Three inches can be quite a bit of difference. 


For example, you can kind of see in this first picture that the skirt is just too long for me. 

I apologize, these aren't the greatest pictures. I'll make Mr. Gardener take them next time. ;)


Pinning it up made it much better for me.

Some people can really pull off that mid-calf, midi look. I, however, look stumpy. So, I just don't do it. ;)

It fits okay, but I'm not in love with how it's pulling across the middle. It makes me feel like it's too tight and made me just feel unattractive.

And I'm a believer that how you feel influences what you look like (and how often you wear something). So I need to make some adjustments here. 

I also realized that I didn't follow the tracing/cutting instructions quite right so the darts are right side in in the back and wrong side out in the front. Oops. 


But at the same time, while I've got some hips and booty influencing the pull in the front, the waist doesn't fit quite right either.

So, I think I will shorten the length, size up to a four instead of grading between the three and four, and take in the darts in the back. 

I'll let you know how it goes. :)

But I'm so glad I did this with my cheap, crappy muslin fabric versus my nice and more expensive apparel fabric (which should be in the mail!).

Are you working on anything interesting?

Linking up with Freshly Pieced for WiP Wednesday!

Wednesday, September 30, 2015

Minky Baby Blanket

So, you know the whole 5 love languages thing?

So, disclaimer, I've never read the book. I have the book. It's on my shelf. Haha. But I know the general principles.

Basically, we're all wired differently. I think this is a pretty universally accepted truth, yes? So, in that same spirit, we show and receive love differently.

Well, I'm not sure what my receiving language is, but I think my giving is gifts. I love to make things for people. It's a reminder for me to pray for the recipient and his/her specific situation and I think that knowing that time was spent on something is an affirmation of love for that person. (There's some selfishness in there, too, I will admit. I like to make. I also like when the things I make are appreciated. I'm human.) But, moreover, I like to show my love that way.

Anyway, our friends' little guy had to have some pretty serious surgery this summer. He came through it like a champ and is doing fabulously well. Praise God! But, I wanted to give him and them a little cuddly something to hang onto in the hospital.

What better than a cuddly blankie when you're not feeling good? Plus, every baby and little guy needs a good blankie. Am I right?


So, I got some minky and some flannel from JoAnn's and went to town.

The little guy's dad plays bass and guitar, so I had to get some musical flannel. Plus, aside, if Mr. Gardener and I are blessed to have children, I definitely got a glimpse into the future when we visited the hospital. They asked Mr. Gardener to play some lullabies on the guitar, which was sweet. But, obviously, lullaby means a sweeter version of Gimme Shelter followed by some Black Sabbath. Yes? No? hahaha

Anyway, I had never sewn with minky before so I looked at some tips online. Got some thoughts and went to town.

So minky. Sucker sheds like a dog in summer. Be prepared. Clean your machine afterward. Have your vacuum handy. Just saying.

It's also very stretchy. So I approached the initial blanket construction a lot like basting a quilt.


After I cut the top and bottom to the approximate size I wanted (really was determined by the width of the flannel minus selvedges - I think it was 45", but I can't remember for certain), I taped the minky to the floor right side up with masking tape.
Then I laid the flannel right side down on top.


One of the tips I read online, which I totally agree with, is to pin the minky like crazy. Pin, pin, pin. 

It builds character.

You will probably live through the pinning.


Then I trimmed the excess minky. For me, it was tremendously easier to trim down at this stage. It was forced to stay more in place and was more accurate.


Then I sewed the pieces together (right sides together) with a 5/8 seam allowance, using my little strip of washi tape on the side as a guide.

While I'm sure you can use a regular foot, I used my even feed foot (or use your walking foot if you don't have a built-in even feed), which I believe made a HUGE difference. It was so much easier with the stretchy fabric. I also recommend keeping the minky on the bottom. I think it feeds through the machine more easily.


Sew, sew, sew, making right angles at the corners.

Leave a space for turning the work on one of the sides and backstitch at both ends so you don't pull out your stitches while turning. Probably 10 inches or so should do.


Before you turn, clip your corners to reduce bulk, but be careful not to clip your stitches.


Turn inside out, tuck in the area that you left open for turning, and topstitch, being careful to catch the open area in topstitching to stitch it closed. I used a 1/2 inch seam allowance and readjusted my washi tape guide accordingly.

Don't forget to backstitch!


There you have it! Wash and gift.

Snuggly baby blanket all around, and it really only takes about an hour to do if you have some basic sewing skills. Once you've made a couple, I actually expect it might take less time.

Easy, loving gift for a friend.

How do you like to show your love? Do you have gifts you love to make for others?

Happy crafting!


Wednesday, September 23, 2015

Getting Started - What's Holding You Back?

Okay, so obviously I have neglected my blog.

I pretty much start out every entry with this disclaimer, yeah?

And I've been thinking about this a lot. I mean, I do things and think to myself, this would be great to share on my blog. Or, I see a cool project someone else has shared and think, oh, I've done something similar but with a little twist or different approach. I should share mine, too, and share a link to theirs. Or, offer my perspective on how to do something. I mean, I've learned to sew from blogs, it would be great to give my thoughts to other beginners.

But what's holding me back?

Well, for one, I am not a naturally organized person. I have to build serious systems into my life to make it work. Time management is not a natural gift of mine. Nor, is really any sort of organization. So, it kind of just snowballs into an unmanageable mess. My house becomes crazy, I need to clean all the bathrooms, vacuum, do the laundry...

So, I just find myself trying to come out from under it all, all the time.

Plus, which my husband has helped to realize, I just kind of shut down when overwhelmed.

This is a great characteristic in someone who is chronically disorganized. ;)

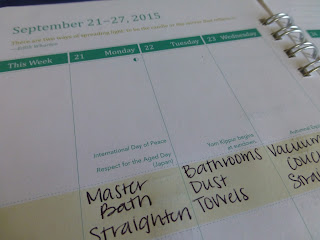
So, I've dug out my standby approach that worked for me in college. The planner.


The Orange Circle Studio "Do It All" Planners are my personal favorite. http://www.orangecirclestudio.com/planners/do-it-all/

You can keep your fancy electronic app. Actually, if that works for you, by all means, that's fantastic - use it.

But I need the tangible act of writing something down in order for it to stick. It's just who I am.

I now have a list of general cleaning actions that I need to complete each week. On a super fancy index card that I keep in the front pocket of my planner.


And I write when I intend to complete them on my calendar. One, it keeps me on track. Two, I get the satisfaction of crossing them off. :) At first, I tried to assign days to do specific tasks, but it made it hard to realign things during busy weeks when we had a lot of commitments in the evenings. The card allows me to see what my week looks like and assign tasks accordingly. (Plus, I know what needs to get done so I know what to ask Mr. Gardener to help out with.) ;)


Which, from an outsider's perspective seems sooo organized (my hair stylist saw my planner and thought I was the most organized person on the planet. Ha!). But, in reality, it just won't get done otherwise. This helps break down what otherwise feels, to me, like an overwhelming set of tasks into manageable chunks.

I've been doing this for a few months now, and it's become routine. And I need routines and systems, people.

If you're one of those people who can just get 'er done, my hat is off to you. Can you tell me your secret?

And, amazingly, I have more time now. Woohoo! Because I'm not just sitting thinking and worrying about all the things I have to do and how am I going to do them, and where do I even start??

So, that's one hurdle down.

The other thing is that all the things that I want in place to blog better just aren't there yet.

I don't take fabulous and professional-looking pictures. I have ideas in my head for logos and branding, but I don't have them yet. I need to develop great content. So on and so forth.

But here's the thing, that's ridiculous.

I do want to accomplish those things. But, if I don't just start, it's not going to happen.

So, I bought a Craftsy class on picture taking with a DSLR and I'm going to start there. We're on this journey together.

So, here's to mid-year improvements and trying to stop worrying about the things holding me back and just getting started.

What's holding you back from pursuing the things you want to do? Do you have any tips or tricks?

See you soon!